Seppia uses the Trint online platform for the transcription and automatic translation of rushes for editing preparation.
In order for automated transcription to be as efficient as possible, it is important to respect a few simple rules for preparing files upstream, before using Trint.
1/ Preparation
The proper preparation of the files to be sent on Trint boils down to two important rules:
- the spoken audio to be transcribed must be as intelligible as possible
- the meta-data of the source file (name, frame rate, Time-Code) must always be preserved and transmitted
Here is the general principle of the typical work process to ensure it:
1 /Import video and audio sources into the editing software
2/ Synchronize video and audio if the audio was recorded separately from the video (external audio recorder disconnected from the camera)
3/ Deactivate all ambient audio tracks (boom, camera-mic, …) in order to keep for export only the one(s) whose human speech is the most audible (it is usually the Lavalier microphone of the speaker)
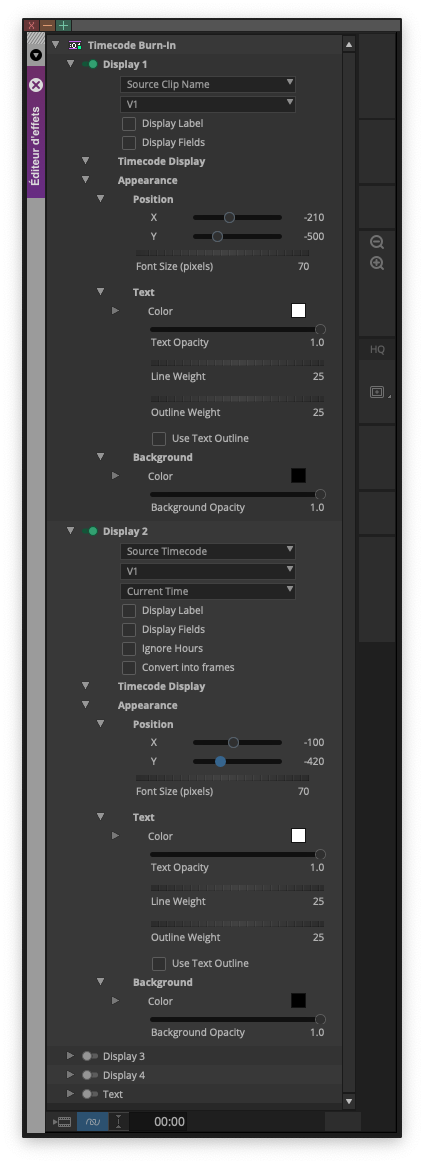
4/ Apply a burn-in text effect that overlays on the exported video:
– the name of the source clip (= name of the camera source file)
– the original Time-Code of the source file (generated by the camera during shooting)
Warning if the file is inserted in a timeline for export, make sure:
– that the timeline is at the same start Time-Code as the source clip
– that the timeline is at the same frame rate as the source clip
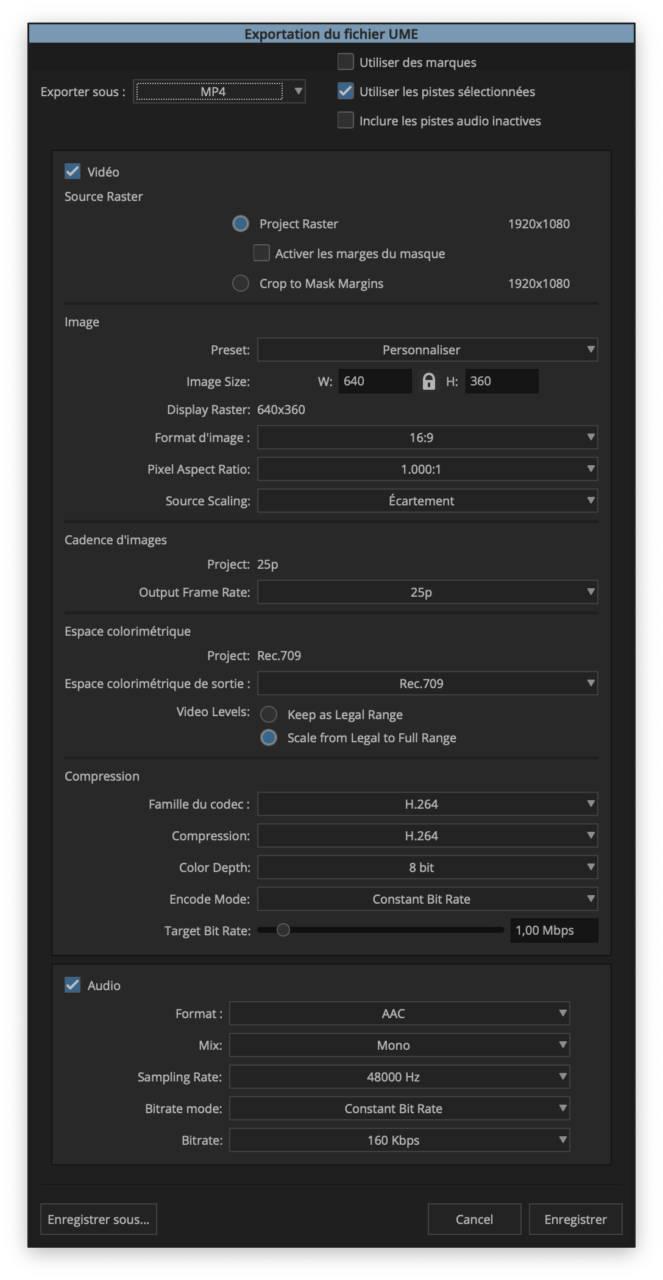
5/ Export the file in its entirety (no IN/OUT points in the file, no sub-selection) so that the export for Trint is exactly the same duration as the camera source file, and the same name.
Export as MP4:
- Video codec: H264
- Definition: 640*360 pixels
- Bitrate: 1 Mb/s constant
- Frame rate: identical to the camera source clip
- Audio codec: AAC
- Only one track: mono
- Sampling frequency: 48000 Hz
- Bitrate: 160 Kb/s constant
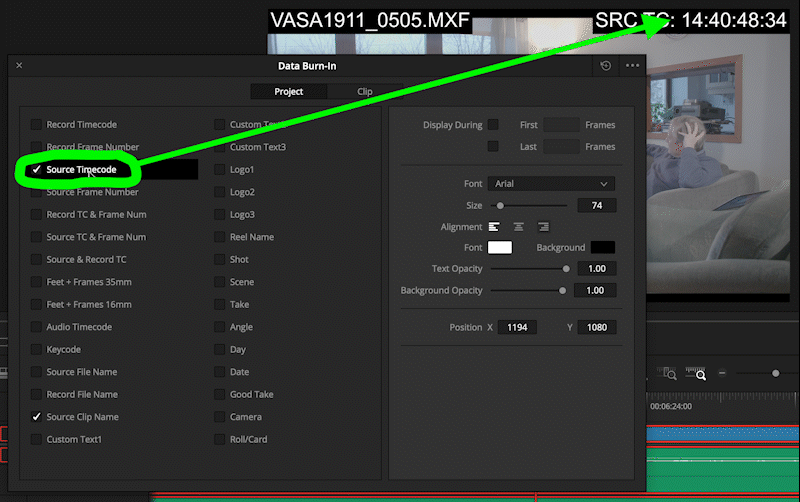
6/ After exporting, quickly check that the MP4 file:
- Displays the name of the source clip and its native Time-Code burned-in onto the video
- Contains the audio track with only the audible speech to be transcribed
In Avid Media Composer
Once the video and audio source files have been synchronized (in a Sub-Clip, for example), they must be inserted in a sequence, in order to be able to add the overlay effect on the upper video track:
- In the bin: right-click on the clip > “Autosequence” to make a sequence with the same name and the same Time-Code as the clip
- Adding an empty V2 video track
- Drag and drop the Time-Code Burned-in effect on the V2, making sure that it reads the information from V1
- Disable ambient audio tracks, to keep only the tracks of the Lavalier microphones activated
- Export the file via the menu File > Output > Export to file…
In DaVinci Resolve
2/ Upload on Trint
Before uploading on Trint, it is highly recommended to:
- create on Trint at least a new folder for a new project, at best a shared disk dedicated to the project (especially if the project is big or if it must be shared with external people):
https://app.trint.com/trints/shared-drives
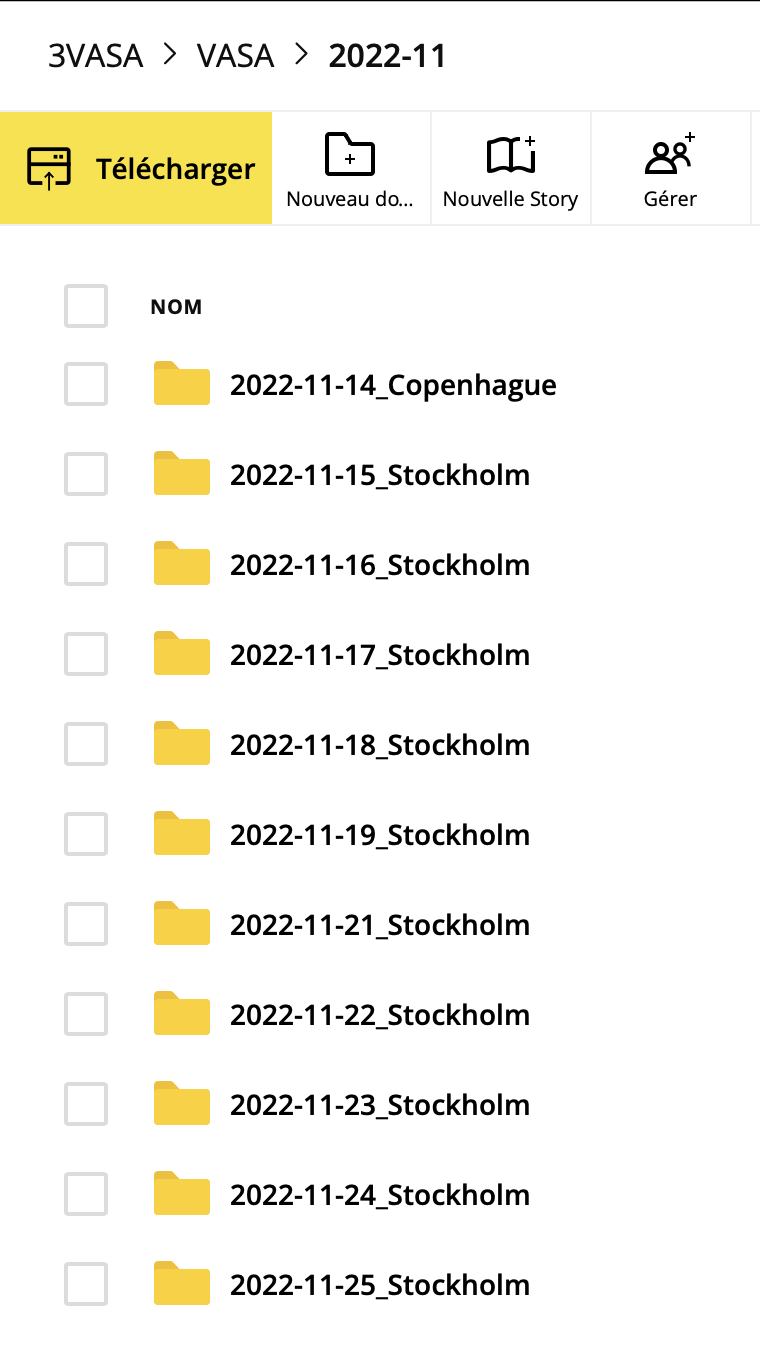
- create a folder per shooting day, named YYYY-MM-DD (for example 2023-01-26 for the shooting of January 26, 2023)
- fill in the Trint dictionary with the proper names or specific terms of the project (family names, places, acronyms, scientific terms, etc.) that will be pronounced by the interlocutors:
https://app.trint.com/trints/custom-dictionary
Uploading files to Trint via the web browser can be long and resource-hungry, sometimes up to the point of crashing the browser page. So it is recommended to upload videos in batches of up to ten. Moreover, it allows Trint to process videos as they are sent.
Trint recommends using Google Chrome browser and disabling third-party extensions that may interfere with the browser upload: https://info.trint.com/knowledge/why-wont-my-file-upload-trint-help-center
Choose the source language to automatically transcribe
After uploading the batch of videos, it’s time to choose the native language to be detected for transcription.
Warning : Trint only detects one language per file, and it is not possible to change the original language afterwards. It is therefore very important at this stage to choose the right source language to detect, by listening to the useful parts of the video source clip.
For example, sometimes a speaker begins by discussing in French or English with the technical team of the shooting, before expressing himself in his native language for the useful part of the interview.
If the video contains two separate languages to be transcribed, then it will be necessary to upload the same video twice, and switching the two different source languages after the upload.
3/ The (delicate) art of transcription
Trint is not perfect, the quality of its automatic transcription depends on several parameters:
- Quality of the sound recording on the set (placement of microphones, absence of parasitic noise, etc.)
- Expression of the speaker (accent, diction, …)
Here are some best practices to manually improve the automatic transcription, especially to prepare automatic translation.
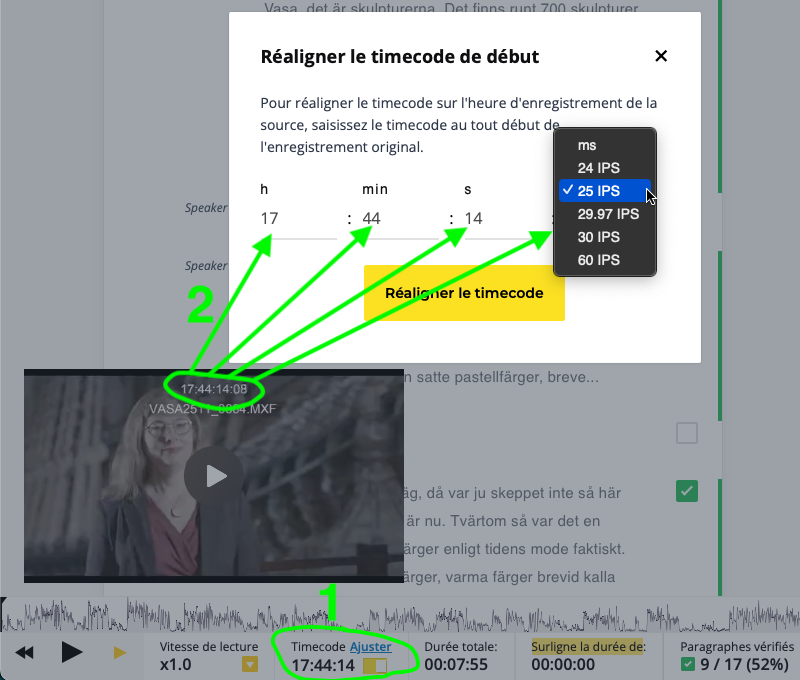
Adjust the Time-Code
Use the “Timecode Adjust” function at the bottom of the window to define the source Time-Code of the first picture of the video clip (taking care of the frame rate), in order to have a transcript text that includes the proper Time-Code of the source video file:
Identify the different interlocutors
Trint will try to identify different interlocutors, but it will often be necessary to correct by hand. Skip a line creates a new paragraph to separate the interlocutors, then assign the right interlocutor to each paragraph.
A line break also allows you to display the Time-Code at the beginning of the new paragraph, in order to have a more precise transcript to find your way in a long monologue. Therefore, do not hesitate to skip lines to split the transcript and thus facilitate the detection of pauses or changes in sentences:
Fix the transcript
Then begins the longest step, the manual correction of the automatic transcript:
Strike rather than delete
If part of the transcribed video will not be used in editing (for example: interlocutor makes a mistake and resumes, intervention of the director or technical team, background or “off-screen” discussions, …) then it is better to use the “Strike” function rather than to delete the passages:
https://info.trint.com/knowledge/strike-trint-help-center
Check and validate
Finally, after a final proofreading, check the boxes next to each paragraph to indicate that the human verification is completed:
4/ Translate
It is possible to start the translation immediately after the first automatic transcript, simply click on the “Translate” globe at the top, and choose the desired target language:
Like the automatic transcription before, the automatic translation is not perfect and requires proofreading, manual correction and validation.